Monday, December 19, 2011

Sewn-up Christmas: Part 3 - Handmade drawstring linen laundry/shoe bags

For the last of my "Sewn-up Christmas" gift ideas, here are some drawstring bags that manage to look pretty impressive notwithstanding that they were really easy to make (remember this is early days for me in the adventures of sewing).


They can be used as laundry bags (especially useful for keeping handwash items separate from the rest of your laundry) or a shoe bag, for taking your nice shoes to work without spoiling them (and your back) on the city streets.

To make each bag, I cut a piece of fabric approximately 90cm by 45cm. I pressed the edges with an iron to form a single hem of about 7mm (ie just folded over once) and machine stitched this hem all the way around the fabric. At each short edge of the fabric, I folded over about an inch of the fabric (this will need to be big enough to fit your ribbon/tape/string) and sewed this down on the wrong side of the fabric, using a zig zag stich for a bit of interest. I then threaded the ribbon through both ends, sewed the ends of the ribbon together (leaving about 20cm on each side of the bag) and then turned the bag to the wrong side and sewed up the sides before turning back to the right side. It was that simple.


For the design, I drew a botanical pattern on a piece of A4 paper, then cut it out using a scalpel and a cutting mat, to leave me with a stencil. Holding it down carefully (and this was quite an intricate stencil, so I must admit, I did use my husbands fingers as extra holding-down tools), I used a sponge to apply white fabric paint over the stencil and then carefully lifted it off the paper to reveal my design.  To fix the paint, I placed an old cloth over the design and ironed over it for a few minutes to fix the paint.  The bag is now ready to use and washable up to 40 degrees!

For Part 1 of my Sewn-up Christmas gift ideas, see Handmade Linen Coasters

For Part 2 of my Sewn-up Christmas gift ideas, see Handmade Pears and Apple Tea Towel


Sunday, December 18, 2011

Quick and Easy Stylish Christmas Tags

Loathe to pay 5 euros for a pack of 5 Christmas gifts, I decided to make my own.  I made 30 of these in about 20 minutes at a cost of less than 1 euro. All you need is some coloured paper or card, a pencil, a pair of scissors, a hole punch, some string and a pen.


Step 1: Measure your paper/card and mark into equal rectangles using a ruler (I got 10 rectangles from an A4 sheet of card).

Step 2: Cut along your marked lines so you end up with lots of rectangles.

Step 3: Trim the corners off one end of each rectangle.

Step 4: Hole punch one hole at the same end of the rectangle.

Step 5: Trim string or yarn into 15cm sections, fold each section in half, feed the ends through the hole in the tag and back into the loop of the rest of the string.

Step 6: Decorate as you desire. I just used a brush ink pen, but you could always use silver pen, Christmassy shapes cut out of contrasting coloured paper, a stamp and ink or cut out shapes using a scalpel.

It's snowing outside here in Munich and attaching these pretty tags to the presents I am wrapping is making me feel very Christmassy!


Saturday, December 17, 2011

Sewn-up Christmas: Part 2 - Handmade Pears and Apple Tea Towel

I love tea towels. Especially anything colourful and fun or any made from beautiful linen. And, being both pretty and practical, I think they make great gifts.

I made this cute tea towel below by simply hemming the edges of a piece of cotton fabric, sewing a decorative edging along the bottom and then printing the bottom section using halves of an apple and pear and some lime green and bright red fabric paint.


You may recall in your early school days dipping potatoes and fruit into bowls of paint. However, I think a more economical and effective way is to paint the fabric paint onto the fruit using a brush before stamping onto the tea towel. To finish the design, I hand painted on the stems in dark brown. To fix the fabric paint, cover the painted design with a cloth (that you don't mind getting dirty) and iron over for a few minutes.

Be sure to let your apple and pear halves dry out for a few hours before printing with them. Although I did this, I still found that the colour changed the more prints I did (although I quite liked that effect). I think this was to do with the fruit juices mixing with the paint, so if you want to keep your colours consistent, wipe the fruit with a piece of kitchen towel in between each stamp.

This is a great one to get kids involved in during the holidays. And, of course you can experiment with other fruit and veg - pineapple rings or broccoli trees for example. It works well to use a paint colour the same as the fruit/veg that you are printing with.

If you want to skip the sewing bit, just buy a plain or striped tea towel and apply your fruit stamps to that.

Have fun!


p.s. for Part 1 of Sewn-up Christmas, see my post on Hand Painted Linen Coasters

Weekend foodie: Absolutely Scrumptious Pineapple, Blueberry and Cinammon Juice

Yes, the rumours are true. Since getting a juicer about a month ago, I have become the juicing equivalent of the born-again-fish-on-the-back-of-the-car Christian. I am hooked on my daily juice and can't but help telling everyone about it. Until now I have resisted bringing my juice-preaching to the blog world, but after having the freakingly insanely delicious juice below, I could contain myself no longer. And it must be good, because I never use the word "freakingly"!

Juices and smoothies not only taste fantastic - enough reason alone to get hooked, but they are seriously good for you. And you don't need to just read it to believe it - As soon as you have one, it's like you can feel all the vitamins, minerals and other nutrients going to every cell in your body and waking them up. My skin is much clearer, my eyes brighter, my tummer flatter, I have more energy and I just feel really clean inside. So if you have one New Year's Resolution for 2012, make it to get a juicer and use it every day.


Although I have a book full of juice recipes, it's not taken long before the experimental cook in me comes out and my mind starts whirling with all sorts of ideas for new juices. That's how this juice came about and I'm sure there will be others.

How to make it

Ingredients (makes one large glass or two small glasses):

1/3 pineapple
1/2 apple
1/2 pear
1/2 cup of frozen blueberries
1 banana
1 tsp cinammon

Juice the pineapple, apple and pear. Then add the frozen blueberries, banana and cinammon to the jug of juice and blend with a hand blender. That's it. You won't need a meal with this - it's a meal (or mid morning snack) in itself!

As for what to do with the other half of the apple and pear, keep an eye out on the blog this weekend...

Why is this juice so good for you?

Where do I start? Pineapple is not only a great source of potassium, iron, calcium, vitamins B, C, E and folic acid, it also contains the enzyme bromeline which helps dissolve excess muscus (good for anyone suffering from a chest infection, asthma or hay fever).

The banana is another source of potassium and the fibre it contains helps ensure that the sugars in the fruit juice are absorbed more slowly to avoid a spike in blood sugar.

Apples and pears are rich in lots of vitamins (including C - vital for the immune system) as well as cancer-fighting anti-oxidants.

Cinammon, as well as giving this juice a real zing and a bit of a Christmassy flavour, has been shown to have insulin-like effects, reducing blood sugar spikes after a meal.  It's also a powerful anti-oxidant.

As for blueberries, they aren't known as a superfood for nothing - they contain vitamins B1, B2 and B6 (the B vitamins are essential for releasing energy from carbohydrates and for healthy skin, eyes, liver and nervous system), vitamin C (immune system boosting), beta-carotene (anti-oxident and anti-inflammatory), folic acid (vital in the early stages of pregnancy for brain development), calcium (bone development), iron (energy and healthy blood), magnesium (helps against muscle cramps), maganese, phosphorous and potassium (all important for bone health) and zinc (helps regulate the hormones - therefore essential for male reproductive health and for pregnant and lactating women). Blueberries are also known for fighting free radicals (those nasty things responsible for the ageing process and cancerous growths). Not bad for a little berry, hey? So, do you need any more encouragement to spend those few dollars/pounds/euros on a bag of frozen blueberries?

p.s. don't forget to always use organic fruit and veg in your juicer - you don't want all those fertilisers and chemicals joining your beautiful juice. If you're in the UK, Abel & Cole can provide you with a weekly box of seasonal organic fruit and veg at a reasonable price.

Friday, December 16, 2011

Sewn-up Christmas: Part 1 - Hand Painted Linen Coasters

I have been day-dreaming for some time about all these wonderful Christmas presents I was going to make now that I have my own sewing machine. So yesterday, with just over a week until Christmas, I decided the time had come to stop dreaming and get on with it.

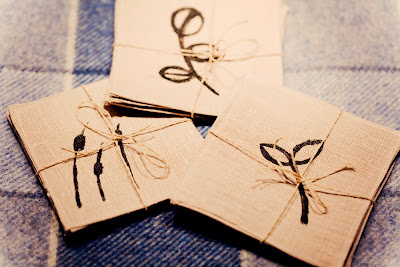
First up, here are the coasters I made for some dear friends of mine. Each set of 4 has a different botanical themed design.


Here's how I made them (instructions are for one set of 4 coasters):

1. First, I cut out 8 squares of my chosen linen fabric. Each square was 13.5cm on each side. After cutting the first one, I used this as a template for the others by pinning it down on the fabric and cutting around it.
2. With each square, I pressed seams of around 7mm all around, then chopped the corners that stuck out, so they wouldn't be bulky once sewn together.
3. I then sandwiched two squares (pressed seams together), pinned in place and sewed around, finishing with a backstich.
4. Once all coasters had been sewn, I painted on my designs using black fabric paint. To fix the paint, I covered the coaster (design side up) with a piece of cloth and ironed over it for a few minutes. Voila!


They may not be perfect, the corners are a little iffy in places and the linen squares didn't always fit neatly on top of each other, but, being a novice at this sewing lark, I was pretty chuffed with them. And my friends who received them seemed to be too.

Variations: You could use the same technique with bigger rectangular pieces of fabric to make place-mats or double the coaster square size and add some wadding in between for a trivet. For the design, you could also have a go with stencilling or printing using potatoes or cut fruit.  Alternatively, just stitch across the coaster with different stitches in a contrasting thread.

Wednesday, December 14, 2011

The Art of Letter Writing

Don't get me wrong. I love facebook. I love that I can connect and keep in touch with all the friends I have made around the world, see their "headline" news and their latest pictures. I also relish getting a long email from a friend with all their news. But I must admit that nothing quite beats opening the letterbox to find, among the various bills and notifications, a beautiful letter like this:


With a letter like this, you don't open it immediately. You wait until you have a quiet moment. You wait until you can sit with a cup of tea and no other distractions and enjoy what will unfold in the letter.  You'll read it a couple of times and then put it in a safe place.  Equally, the same consideration will be given to your response. You'll go and find your nice writing paper and choose the right time to compose your response.

We've become so used to fast communication that the whole, somewhat indulgent, process of receiving and writing a letter got me thinking.  What makes a letter so special? Do we write differently in a letter compared to an email or a facebook message? I think so.

In a letter, we may convey some of the happenings of recent days, but we may also be more likely to provide some details about where we are writing, how we are feeling, what sounds we hear and what we might see out of the window. We can, through words, paint a picture of a little snippet of that moment in time. A moment when we have cast out other distractions and focused purely on communicating to a particular friend. This is, I think, both the "art" of letter-writing and also the thing that makes it so special. It's a real sign of respect that your friend has taken the time to sit down, write about their life to you, seal and address the letter and take it to the post office. It's not as easy as an email. And for that reason, it's more special.

Let's not lose the art of letter-writing. I'm sure we all know someone who would appreciate a letter in the post. Now is as good a time as any to get out your writing paper and pop in a little letter with a Christmas card. And you never know what will appear in your letterbox in a couple of weeks...

Friday, December 9, 2011

My first ever digital illustration - "The Swan"

In order to get the most out of my Illustration course over the next year, I'm going to have to get to grips with digital illustration. So I opened up the (never used) Illustrator application that I had with my Photoshop software and watched some of the video tutorials. It all seems pretty complicated right now compared with just wielding a pen or brush - there is soooo much to learn! I'm sure I'll get the hang of it eventually (and it will help when I get a tablet and pen to draw with instead of the mouse!), but here's my first attempt (inspired by my Winter canal walk photos). Hopefully I can look back in a few months and see a vast improvement!


Wednesday, December 7, 2011

A Winter Walk Along the Canal - Photo Essay

After all the hubbub of Art Every Day Month, I had a little break back in the UK and spent one lovely morning with my mama walking along the canals in the area. I could tell you all about what we saw, but I think I'll let the pictures do the talking.

All images copyright Lia Edwards 2011. Not to be used without permission.


All images were shot on the Canon 5D MkI with a 100m L f.2.8 macro lens.

Wednesday, November 30, 2011

Day 30 "Art Every Day Month" - We did it!

Wow, what an amazing month it's been! This is the first year I've participated in Art Every Day Month and it really has been a great challenge to create some kind of art each day. I feel it's really moved me forward, I am really starting to learn to draw now (hooray) as well as trying out some other skills and I feel energised to continue the journey. I'm now looking forward to being able to spend a bit more than a day on some projects and really getting to grips with my illustration course.

Well done all the other AEDMers - here's a little papercut for you all!


p.s. if you want to keep following my work and creative musings, then please "like" the Drawn To Creativity facebook page: http://www.facebook.com/pages/Drawn-to-Creativity/101175296656224

Tuesday, November 29, 2011

Day 29 "Art Every Day Month" - Birds on a Wire

I love all of the amazing leaves growing up the walls in Munich. Here are some I found recently that look like beautiful exotic pink birds on a wire. Nature's art is always my favourite.


Monday, November 28, 2011

Day 28 "Art Every Day Month" - Happy Birthday Papercuts

After my previous disaster with reverse lettering (see Papercut Trial and Error), I thought for my next papercut, I would keep it easy and simply freehand cut letters into paper. Perfect for some unique birthday cards, don't you think? Happy birthday Karen and Sarah!


Sunday, November 27, 2011

Day 27 "Art Every Day Month" - Linocutting fun!

Since doing some research about 20th century British illustrator, Edward Bawden, for my illustration course, I've been dying to try out some linocutting.  In fact, linocutting and its predecessor, wood-cutting, are mediums that most of the great artists from Duerer to Picasso have used alongside painting and drawing. So I bought myself a little lino cutting set and thought it would be a great way to produce some handmade Christmas cards.

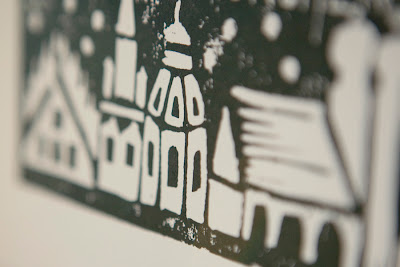
I can't show you the full final result yet, as I don't want to spoil it for the recipients, but here's a little sneak peek:


Here's the process.

1. Work out your design on paper, then draw this onto the lino. Make sure the design is in reverse (I check in the mirror)


2. Then, using special lino cutting tools, cut out all the bits that you want to stay white. You're basically carving out your picture to create a stamp. I recommend using a special linocutting worksurface, which has a corner to hold the lino in place and a lip to fit over the table. This will help avoid injury if/when the knife slips. Also always cut away from you, turning around the lino, if necessary.


3. After cleaning it up, roll the lino ink (I used black) onto the lino, press down a card or piece of heavyweight paper on top of the lino. Then hold in place while you use a spoon to rub the back of the card/paper.


4. Carefully lift off the card/paper and let dry.

5. Repeat steps 3 and 4 until you have all the prints you want (if you are doing lots like I did, you will need to regularly clean up the lino, so it doesn't get all clogged with ink).


I really enjoyed this process. I did nearly 40 prints and every one came out slightly differently. I hope the recipients will enjoy their little piece of unique Christmas artwork.

Saturday, November 26, 2011

Weekend Foodie: Live Long Soup

OK, so I can't promise that by eating this soup you will live to 100, but sweet potatoes really are a superfood, packed with antioxidants, anti-inflammatory nutrients and blood sugar regulating nutrients. It is therefore no surprise that the people of the Japanese island of Okinawa, who are the longest lived (and healthiest) people in the world, live off a diet which includes a significant amount of sweet potatoes.  Both the lentils and the sweet potato are complex carbohydrates, releasing energy slowly into your system (low GI).  Sweet potato is also a great source of vitamin A (in the form of beta-carotene which is not destroyed by cooking). Vitamin A is vital not only for healthy skin and eyes, but also for the immune system and prevention of cancer cell growth.  The spinach added at the end (to keep it's iron content) will help support your kidney and liver function as well as helping you avoid fatigue (Tip: if you feel tired a lot, upping the iron in your diet can really help - include vitamin C to help your body absorb it). Oh, and I did I mention this soup is souper-douper easy to make ('scuse the pun!)?

Ingredients (for 2 servings):

1 cup red split lentils
3 cups vegetable stock
1 large sweet potato, peeled and diced
a bunch of fresh spinach and herbs of your choice, e.g. basil, parsley

Put all the ingredients, except for the spinach and herbs, into a pan, bring to the boil and then simmer for around 10 minutes until the sweet potato is soft. Take off the heat, add the chopped spinach and herbs and give it a whizz with a hand blender (if you don't have one, a potato masher will do the job). That's it!


Friday, November 25, 2011

Day 25 "Art Every Day Month" - Winter Sketching

Art Every Day Month has really inspired me to get drawing. I'm less scared of it now and happier to just get out my sketchbook and have a go.  Here's a couple of sketches I did today:

The first is me in my winter get-up. It is completely imaginary, not from any reference (other than an impression of how I probably look going around town). I like the idea of doing a series of these with this character, on my bike, at the market etc. etc.


The second is a sketch I did of some of the elements of the Christmas markets in the Marienplatz in the centre of Munich. The elements don't all fit together, not all the details are there and I had to work quickly as my hands were frozen stiff from the cold, but I think I'll try to do little sketches like this every day to provide me with references to work from for more "final" pieces.


Thursday, November 24, 2011

Day 24 "Art Every Day Month" - Old Photographs and a bit of Photoshop magic

I'm busy today digitally restoring some old slide photographs of me and my brothers and sisters when we were little. The dust marks are incredible, and a bigger task to remove than I intially thought. I'm making progress, but I don't want to spoil the surprise for my siblings, so instead, here's a piccie of toddler Lia in the snow, altered in photoshop to reduce it just to the basic lines that make up the image.  A bit cheesy, perhaps, but I kind of like it (and the process is certainly quicker than zapping thousands of specs of dust).


Wednesday, November 23, 2011

Day 23 "Art Every Day Month" - One Liners

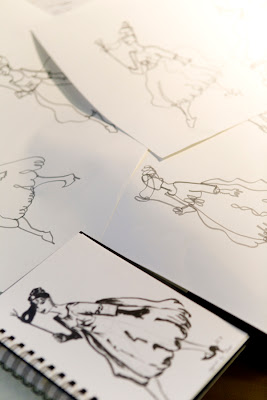
One-liners are a classic drawing exercise. The idea is to draw the whole image in one line, without lifting the pen from the paper until the drawing is done. It forces you to really think and see how all the elements of a particular form fit together in a two-dimensional space.  So I thought I would have a quick play with it this morning, using my poofy dress lady from yesterday as inspiration.

I drew her a number of times, each time starting at a different point in the image. Each one was completely different to the one before.


I probably could have gone on all day, but these were my favourite two.


You don't get a perfect picture, that's not the point, but I think it's pretty amazing the likeness you can get with one line.

Picasso was a master of the one-liners - here's a daschund one-liner by the man:


This is also a great one to try with kids.