Last weekend I undertook a 2 day course in printing techniques that you can do by hand. Our tutor,
Yoko Omomi, was absolutely fantastic and took us through a whole load of different techniques that you can do at home with little more than some linoprinting ink, a few different types of paper and a brayer/roller.
Here are some of my favourite works from the weekend:
"Purple Swan" - made by applying purple shades of lino ink to a loose weave fabric and then randomly and repeatedly placing this all over a sheet of paper. A plain piece of white paper with the swan cut out (from another collage) was then placed over the printed paper and the eye and beak detail added digitally after scanning.
"Storm over the City" - made by applying ink to various pieces of textured cut out paper, cardboard and netting, arranging these on a plastic board, placing brown paper on top and applying pressure with a Japanese bamboo printing tool, known as a "baren".
"Bulrushes in the wind"- Monoprint on tissue paper. Monoprinting is a form of printing technique where the image can only be made once (hence "mono"). For the image below, I applying ink to a plastic board, laid tissue paper over the board and then drew the bulrushes onto the back of the paper with a pencil and gently brushed over some areas with a dry paintbrush. Where you draw prints much darker but the rest of the image gets some lovely textures. I loved the way this technique worked with the silky tissue paper.
"Intertwined" - Another example of monoprinting, this time on brown paper. The botanical design was inspired by some sketches I did from my mother's garden last summer.
"The British Countryside (Part 1) - Inspired by Edward Bawden" - Linocut. This was for an exercise in history of illustration as part of my current studies. Unlike monoprinting, a linoprint can be printed over and over again. See the previous post
Inspired by the Old and the New for more on this image.

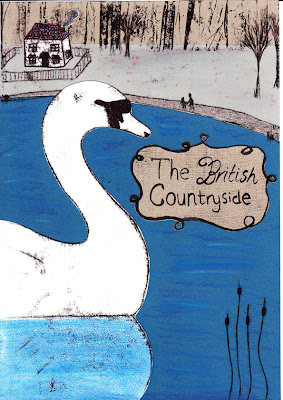
"The British Countryside (Part 2) - Inspired by C.S. Neal" - This image was created by collaging various different printed elements, mostly using the monoprinting technique described above. I started with 3 different coloured papers glued onto paper to create the water, the land and the sky. The woodland effect was made by folding brown paper in a concertina fashion, then flattening it back out, leaving some folds in, applying ink and then printing it onto the top section of the image. The swan and the house were all made separately by monoprinting, then cut out and stuck onto the image. Then I monoprinted the whole image, adding trees, bulrushes, the man and child, the path and a fence around the house. I made the shield by applying ink to a loose linen weave fabric and printing this onto brown paper. I then drew on the lettering and the frame, cut it out and glued it in place. The image was finalised with some pastels for texture and some more pen work to define some of the elements.
It was great to learn all these techniques, but one of the best things about attending a hands-on workshop like this is how much you learn from seeing what the other students create and how everyone develops their own techniques and style. I'll certainly be having some fun experimenting more at home with what I've learnt.


