Friday, September 30, 2011

Plucking up the courage to take that first step

Sometimes taking on a new creative project can be pretty daunting. The end result can seem so big and unachievable, almost to the point of stopping you progressing altogether. I’ve been struggling for a while with my next photography exhibition with The Light Shed, based on the theme of Urban. I made some progress last week, when, having considered a number of options as to what my intepretation of the theme would be I whittled it down to the idea of the “Urban Community”: a series of portraits of the people who make up my local community in Munich.

The next step, and most daunting of all, was to actually start to approach people to photograph. I’m pretty comfortable doing this in English, but to do this in German was a whole other thing. So today, when I went to pick up my bike from its service, I slung on my camera, practised a couple of sentences in German explaining my project and (deep breath) asked the bike shop owner if I could take his picture. He was more than obliging, and seemed pretty chuffed about the unexpected photo shoot. And now I’ve made a start, I’m sure it’ll be much easier to approach future subjects.

Here’s my favourite picture from the shots today.
What a lovely chap!


ps my tips for this type of photography: 
* explain what the pictures are for, how they will be used and why in particular you are interested in photographing the person.
* wait until they have a free moment (no customers around) and keep it brief (you are asking them to take time out from what they are doing) - I only took 12 shots in total.
* after a few shots, show your subject the pictures on the back of the camera so they can see what you are getting (also allows you to check to make sure they are looking ok)
* try to get eye-contact. It usually makes for a more engaging image.
* offer to give something back in return, eg. a print of the final image/invitation to exhibition opening - get contact details if necessary.
* say thank you!

Tuesday, September 27, 2011

From idea to creation


One of the problems of those who are creatively-oriented is getting from idea to actual creative output. We are full of ideas. Sometimes too many ideas. But actual doing something with those ideas or finding the time to work on and complete a project is another thing all together. 

Here are my top 5 tips for getting from idea to realisation (i.e. creation) of the idea.

1.  Start broad: When working on a project, don’t necessarily go with the first thing that comes into mind. Play with lots of ideas. Talk to friends/colleagues about them.  Sometimes by just talking though an idea aloud you will know that it’s not going to work or that it may have potential.  Don’t take it all too seriously or put pressure on yourself that the idea must be “the one”. The ideas may not all be good but by working through a few, you will eventually get to the right one. As Edward de Bono says “It is better to have enough ideas for some of them to be wrong, than to always be right by having no ideas at all”.
2.  Then focus: From all the ideas you have worked through, you should eventually arrive at something that you know feels right. The more focused an idea, the better the final output will be. My own experience of this has been with planning work to feature in photography exhibitions. With the exhibition I mentioned in Collaboration across the globe, the initial idea was the 1950s. But this was really broad. So I decided to focus on haute couture and the Dior "New Look" era. That then dictated the research I did, the inspiration board I created to communicate the idea to the other people involved, the image taking and final editing and post production work.
3.  Set goals: This is nothing new, but so often we can drift along with an idea, never really getting anywhere. Set yourself a deadline. Work out the steps that need to achieved along the way (for example, preparing a brief, research, initial sketches/drafts, finding the people you will need to involve) and the timeframe in which you will do them. Keep them bite-sized. Write it down. Put it in your calendar. If other people are involved, make sure they are aware of the timescale and what needs to be achieved by when and who is responsible.
4.  Be part of a creative community: For me, I find the fortnightly meetings with the Munich Creative Arts Group a fantastic way to make sure I am setting myself goals and then achieving them (I don’t want to turn up and tell 10 people I haven’t done what I said I was going to do). If you don’t have a group like this in your area, then start one up. You might be surprised at the number of people you know who want to do something creative in their lives and the energy that bringing those people together can create.
5. Have fun! Creativity should be fun. It shouldn’t be a chore. If you have set yourself a goal, for example of writing a story or learning a particular piece of music, but you really just don’t want to do it, then it’s probably not what you are passionate about. Channel your energies into something you find fun and enjoyable and make sure it is something that you choose to do, not something you have told yourself you have to do. That’s when the childlike, playful quality emerges and the best creations are made.

Right, now I'm going to practice what I preach and start
planning my ideas for the "Urban" photography exhibition I'm
participating in later this year. I've already narrowed it down
to a series of portraits reflecting "the Urban community" so
now I need to set myself some goals to achieve...

Saturday, September 24, 2011

Weekend foodie: Warming sweet potato risotto with a salsa verde dressing

I love risottos. Once you have mastered the basic method, the possibilities for variation and using whatever you have in the kitchen are endless. These days I tend to use brown rice or mixed grain rice which have slow release carbohydrates for long-lasting energy, but you can of course use the classic risotto rices such as arborio, carnaroli or vialone nano.


This version, with sweet potato, is autumn comfort food at its best and the addition of the salsa verde style dressing ensures it’s anything but bland. You could substitute the sweet potato for pumpkin and/or (as shown in the picture), add half a cup of frozen peas towards the end of stage 5.

Ingredients:

Risotto:
1 tbs olive oil
½ large onion, finely diced
tsp dried oregano or rosemary
1 cup mixed grain rice
2 small sweet potatoes, peeled and cut into chunks
2 litres of hot vegetable stock

Salsa verde dressing:
small handful of mixed fresh herbs (such as parsley, sage or basil), chopped finely
2 tbs good quality extra virgin olive oil
1 tsp balsamic vinegar
½ tsp agave nectar or honey

1.  On a medium heat, heat the oil in a high-sided wide saucepan, add the onions and oregano and slowly cook for around 7 minutes or until the onions are soft. Be careful not to brown the onions, you just want them to soften (this is what the Italians call “soffrito”).
2.  Add the rice, stir well and cook for a further 2 minutes, stirring all the while and then add the sweet potato, continuing to stir for another minute or two.
3.  Add in enough stock to cover the sweet potato, turn up the heat a little and, stirring regularly, cook until the liquid starts to be absorbed.
4.  Keep adding ladeful by ladeful of the stock, so that the sweet potato is covered by the liquid, until you feel that the sweet potato is soft. Then continue adding ladefuls of stock (the sweet potato no longer needs to be covered by the liquid) and stirring every now and then until the rice is cooked (this will take around 20 minutes, depending on your rice – pure brown rice may take 35 minutes)
5.  Meanwhile, combine the salsa verde ingredients in a small bowl. Season with salt and pepper to taste.
6.  Once the rice and sweet potato are cooked and the water absorbed (you may need more or less than the 2 litres, depending on how quickly your rice cooks), take off the heat, drizzle a little olive oil over the risotto, put the lid on the saucepan and leave for 1-2 minutes.
7.  Serve with the salsa verde dressing drizzled over the risotto.

Serves 2 hungry people or 4 as a starter.

Friday, September 23, 2011

Trial and error - Autumn Leaves in mixed media


The first signs of Autumn have appeared here in Munich the last couple of weeks and it’s got me excited about the upcoming season of the nights drawing in, wrapping up warm and making stews. But my absolute favourite thing about autumn is kicking through crunchy leaves. So the other day, as I noticed that leaves were starting to fall on the ground, I picked up a few and thought they could make a good subject for some drawing and painting exercises.

I didn’t have any particular end goal in mind, I just laid out all my various materials on the table and had a go at drawing and painting my 3 subject leaves using different media: graphite pencil, charcoal pencils (softened with a paper blender), coloured pencils; gouache paint and combinations of all of the above.  I drew about 16 leaves in total. Then I cut them out using a scalpel and cutting mat. When I did so, I noticed that the cut-out holes made good stencils, so I then filled a page with stencilled leaves.


I originally thought that a whole page full of leaves would be my final piece, but when I assembled it, it looked a bit too busy.


So I played around with different compositions and finally decided my favourites were the simple ones with just a few leaves on the page. 


I’m not sure I have decided what the final piece will look like. Maybe I will incorporate the leaves in a future work. But it was a great exercise in trying out some different techniques and seeing what my favourite materials were. Although I love the colour of the paint ones, I particularly liked the graphic look of the leaves drawn with charcoal and then softened with a paper blender.

Sometimes it’s the journey, rather than the destination. And sometimes less is more. 


Monday, September 19, 2011

A picture is worth a thousand words


One of my very good friends in Sydney, Joe, is turning 94 next week.  What on earth do you get a 94 year old for his birthday? When I spoke to him at the weekend, he was so delighted to hear all about our new life in Munich. He explained that, at his age, you live vicariously through the lives of others. So I thought I would put together a little album of the places my husband and I have been since we last saw him, some pictures of our new neighbourhood and, of course, us in our traditional Bavarian outfits at Oktoberfest.  Shamefully for a photographer, I can’t remember the last time I actually got prints done and put them in an album (other than for a client), but it was pretty quick to do and I’m sure it’ll mean a lot to Joe.


I used a small 4”x6” album with sleeves that you just slot the pictures in, so no glue required. And I just introduced each section with a few words about the pictures.  If you have children, this kind of thing could also be a lovely gift for grandparents or relatives abroad.  Sometimes the most simple act can mean so much to another.

Saturday, September 17, 2011

Weekend foodie: Italian style tuna, bread and tomato salad


As you know, I’m all about food that, as well as being completely yummy and nutritious, provides long-lasting energy for the day. That usually means protein and some wholegrain foods as well as some veggies. This recipe provides all of those, is really quick and easy to throw together and is a great way of using up old bread. It’s really an adaption of the Italian bread salad, but with tuna for extra protein. Just one thing to note: you'll need proper crusty bread for this, like ciabatta, or I used a multi-grain one in the picture – your white ‘plastic’ sliced bread won’t cut it.

Ingredients:
* 3-4 thick slices of day-old bread
* 250g punnet of mixed tomatoes (eg cherry, roma etc.), chopped
* 120g can of tuna in olive oil
* a few sprigs of basil, chopped
* 1 tbsp red wine vinegar or balsamic vinegar
* (optional) 1 tsp agave nectar/honey
* (optional) 1 tsp capers in salt, washed, drained and chopped
* 2 handfuls salad leaves
* extra olive oil for drizzling

1.  Cut the bread into bite-sized squares. If the bread isn’t very dry, pop the squares on a tray in an oven or under the grill for a few minutes until they start to toast (but you don’t want them too brown).
2.  Put the bread and chopped tomatoes into a serving bowl, add a little olive oil and scrunch up with your hands – really get in there as you want the bread to absorb as much of the tomato juices as possible.
3.  Mix in the tuna (with about half the oil from the can), the basil and vinegar. I also like a teaspoon of agave nectar or honey and some chopped capers at this stage.
4.  Leave everything to soak up the juices for 10-20 minutes and serve at room temperature, adding your salad leaves and a drizzle more olive oil (if you think it needs it) just before serving.

For a vegetarian version, you could replace the tuna with a jar of antipasto, like olives or grilled aubergines/eggplant.

Serves 2-3.

Thursday, September 15, 2011

When did you stop having hobbies?


When you were at school, did you have a whole bunch of hobbies that you did, not for any long-term career goal, but simply because they were fun and you enjoyed them? As a child and teenager, I probably did have an annoying amount of hobbies (including Irish dancing, kung-fu and ballet), but my main hobby was always music - playing piano and being a cellist in the local youth orchestra. So how I went over 10 years hardly playing a note, I don’t know. For some reason, when we "grow up", we leave hobbies behind. Hobbies are associated with something kids occupy their time with and it’s not exactly socially acceptable to have a "hobby" beyond the age of 17.

A few years ago, I realised over the course of my time training to become and practising as a lawyer, I had lost all my old hobbies. I envied the resumes of the young graduates entering the profession and all their interests outside of the law. So that was it. I bought a piano. It was one of the best things I ever did. I am not the greatest pianist in the world, nor will I ever be, but it all came back to me much quicker than I thought.  It may not serve any career-orientated purpose (since, let’s face it, with my tiny hands, I’m never going to be a concert pianist), but when I’m on my own, playing a piece, I get lost in it. I am allowed to have emotions and for those emotions to be channelled through the music. I can imagine a story behind the music and can feel and live that story while I play. Yes I make mistakes, but it doesn’t matter. For that time, while I’m playing, everything else goes away. And that in itself is enough of a reason to play.

So here’s my challenge to you. Stop telling people you "used to" do this or that. Pick up the instrument you used to play, draw and paint again or take up a dance class. Why should kids have all the fun? You might surprise yourself.


Tuesday, September 13, 2011

Embracing the unexpected (in this case, a pottery wheel)

When I woke up this morning, I had no idea I was going to have a pottery lesson today. But by lunchtime, there I was, legs clamped around a pottery wheel, hands covered in clay, throwing (or rather attempting to throw) a pot! All thanks to my new friend and upstairs neighbour, Rajiv.

The funny thing about when you start to embrace a creative life is that somehow you attract others who also have that creative spirit. Rajiv had heard me playing piano so when we met each other coming into our apartment building the other week, we got chatting.  I invited him to the Munich Creative Group breakfast meet-up this morning, where I found out that (as well as his numerous talents for acting, screen-writing and opera singing) he is a potter. Next thing you know, he’s teaching me how to throw a pot!


Aside from a brief stint in the late 1980s down at the local arts centre, I’ve really never done any pottery, normally preferring to stay in the 2D realm of the arts. But I’m all for trying and learning new things and, even though I didn't actually succeed in making anything other than a mess, it was a lot of fun. But the main thing I took away from my pottery 101 lesson is that, as with many creative pursuits, it's a form of meditation. You have to be present in the moment; still and calm, yet focused and never letting the ever-spinning wheel distract you. And I think that’s a lesson we can all apply in life generally.

Here’s Rajiv showing how it should be done.


Monday, September 12, 2011

Collaboration across the globe

Following on from my previous post, Collaboration... and cake, while I was living in Australia over the past few years, I collaborated with a group of other photographers to produce regular exhibitions.   They taught me a huge amount and certainly helped take my photography to a new level (in return for which I bossed them around to help get the exhibitions up – after 10 years as a lawyer, I’m pretty good at writing ‘to do’ lists).  We’ve decided not to let the fact that I have moved 10,000 miles away to Munich stop us from collaborating (or stop me from bossing them around).  So I will be participating in their next Sydney exhibition, based on the theme “Urban”.


Here are some pictures from the last exhibition, which had a 1950s theme. I was inspired by 1950s haute couture, the Dior "New Look" and the fashion photography of Richard Avedon and Cecil Beaton. As you can see from the credits below, it was quite a team effort and involved a lot of planning and preparation. But it was worth it - I even got a mention in the Sydney Morning Herald entertainment supplement. It's going to be a tough one to beat!


Credits
Models (in order): Charlotte Brierley, Amanda Dallimore and Lara Stanley
Millinery: Catherine Kelly
Hair & Make-up: Cheryl Tang and Tenny Boyjian
Styling: Abby Macaranas
Assistant photographers: Robert Walsh (studio shoot) Lizanne Perry (on-location shoot)


All images copyright Lia Edwards 2010. Images may not be reproduced or used for any purpose without prior written consent.

From jam jar to make-up brush holder


I'm a firm believer that storage for ordinary things shouldn't have to look ordinary. It's nice to find something pretty in unexpected places. So in a “Blue Peter” moment this morning (maybe only those of you who grew up in the UK will get that reference), I rinsed out this jar and, with a bit of double-sided sticky tape and some wrapping paper I had in the draw, created this cute container for my make-up brushes.

I’m not a particularly “crafty” type, but this was dead easy.  I just measured the circumference and depth of the straight bit of the jar and cut a piece of the wrapping paper to size. Then I stuck small pieces of double-sided sticky tape along one edge of the right side of the wrapping paper and carefully placed it into the jar (sticky side at the top and towards the glass). Voila!


If you wanted to get really creative, you could make your design for the paper (or use your office doodles). You could also use to store pens & pencils or as a tea light holder, but with the paper on the outside (to avoid fire hazard) and some wire bent around the opening so you can hang it up.

Saturday, September 10, 2011

Weekend foodie: Guilt-free banana loaf

OK, let’s get one thing straight here. Who came up with the name “banana bread”? It’s clearly not bread. Since when did bread have a whole heap of sugar and butter and eggs? It’s clearly a cake. And usually not one that’s as good for you as the name might suggest. That is, unless you follow this recipe.  Inspired by the Babycakes NYC and Sophie Dahl versions (I can’t help but mess around with recipes), below is my butter-free, sugar-free but utterly delicious version.  I use agave nectar instead of sugar. It’s a much lower GI, so slowly releases into your body avoiding the spike in blood sugar you get from ordinary refined sugar (and therefore giving you lots of energy to pursue your creative pursuits without needing a nap). And I use olive oil instead of butter (something the Italians have always known). I also find wholemeal spelt flour easier to digest than wheat flour, but use whatever you have in the pantry.

Ingredients:
4 x ripe bananas, mashed up
50ml olive oil plus extra for greasing
¾ cup of agave nectar
1 egg, beaten
1tsp vanilla extract
1 tsp baking powder
1½ cups of wholemeal spelt flour (or whatever flour you normally use)

1.  Preheat oven to 180C/350F (or if your oven is fan forced, 160C/325F) and grease a loaf tin.
2.  Put the mashed bananas into a large mixing bowl and mix in the olive oil, agave nectar, egg and vanilla extract.
3.  Add the baking powder and then mix in the flour last.
4.  Pour into the loaf tin and bake on the middle shelf for 1 hour, or longer if necessary to ensure that a knife comes out clean.
5.  Leave to cool (if you can resist) and serve with some fruit and yoghurt (or as the Australians do, toasted with a little butter)


If you want to vary it, you can add in some chopped walnuts at stage 3, or (as I did for the one in the picture), grate in a square or two of dark chocolate and add a tablespoon of cocoa powder.

Thursday, September 8, 2011

Stepping the other side of the lens


As a photographer, I get to hide behind the non-scary side of the lens, giving a constant feed of directions and instructions to my subject on how to pose. Today the tables were turned on me. Talented Munich-based painter, Julie Galante* is working on a series of large-scale paintings of women in dirndls** and I offered to sit for one. Julie paints mostly from photographs, so we spent some 20 minutes or so with me posing in my new dirndl while Julie took pictures.
I’ve taken self portraits before as I’m a big believer that they are a really useful exercise in understanding how it feels to be the other side of the lens, but I must admit it had been a while.
I felt a bit self-conscious to start with, but we soon got into the swing of things, moving through subtle variations of different poses and expressions, using hands (I love hands in portraits) and before we knew it, Julie had taken over 500 shots and I certainly had a better appreciation of what it’s like being in front of the camera. Hopefully Julie will find something of inspiration and I’ll be able to report back with the end result in a few weeks!

*You can see Julie’s work at http://www.floggingthemuse.com/
**A dirndl is the traditional Bavarian dress for women. For more info, see this great article: http://rachelsstyleguide.blogspot.com/2011/09/in-praise-of-dirndl-oktoberfest-2011.html

P.S. Isn't Julie's studio space fab? That light! Oh, so envious!

Wednesday, September 7, 2011

Taking the time to stop and stare


One of the problems I have found with travel photography is that, if I’m not careful, I can spend more time looking through the viewfinder than actually being truly present in a place.

So I have now taken to doing something I used to do years ago. I bring a sketchbook with me, and try to take some time out to draw something of interest on my travels. On a recent day trip to the Bavarian town of Augsburg, I did this little illustration of the “Rathaus” (town hall).  I use pen because, unlike pencil, it means you just have to live with your mistakes and get on with the drawing, so it’s much quicker. I also think the inevitable imperfections from having to make permanent marks add character.  It took about an hour and certainly made me appreciate the intricacies of German 17th century architecture!


Alternatively, if you don’t have the time for a sketch, sometimes just turning around with your camera can provide you with a new perspective on a scene…


Tuesday, September 6, 2011

The power of the present moment. And some pretty flowers.

It took me a long time to cotton on to this, but in order to create anything, whether it’s a photographic image, painting or poem, you need to be present in the moment, aware of the world around you. So often our thoughts are consumed by the future (“What shall I cook for dinner this evening?”) or the past (“I wish I has said…”), we forget that the only reality is right here, right now. As I was doing some macro (close-up) photography of the flowers around the apartment today, it occurred to me why flowers and all things botanical are one of the most common themes in art, photography, textile design and poetry. I think it’s because, for a moment, we are so transfixed by their perfect structure, regularity and colour combinations that, just for that moment, we forget about the other worries of the day and are truly in the present. Here are some of the shots I took.


Technical info: Shot with Canon 5D, 100mm 2.8 macro "L" lens at f3.2-f.3.5 (with varying shutter speeds and ISO), about one stop overexposed. Manual focus. Processed in Camera Raw. No changes made in Photoshop.


All images copyright Lia Edwards 2011. Not to be reproduced or used for any purpose without prior written consent.

Sunday, September 4, 2011

Creative Juice


To get your creative juices flowing (and keep them flowing), I reckon it’s important to have a healthy diet with foods that will act as a slow release of energy into your body. As much as I love a good cup of English breakast tea and the occasional piece of cake, I do have to watch that I don’t end up on a sugar rollercoaster. So here’s my mid morning energy boost smoothie, which is easy-peasy to make:

I just whizz up the following in my hand blender:
* one banana
* half a cup of frozen berries (I always keep some in the freezer)
* about a cup of your favourite milk (I use oat milk or rice milk, but you could use normal milk or soya too)
If you’re a chocoholic, you won't regret adding a teaspoon of cocoa.

It takes about 30 seconds, tastes delicious and will keep those cookie cravings away for a couple of hours while you get on with your creative pursuits or other business of the day.


Friday, September 2, 2011

Laundry day, painting, collage and a bit of imagination

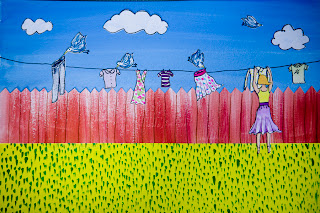
Friday is laundry day for me.  So while waiting for the washing to dry, I thought I would practice a bit of illustration.  I day-dreamed of birds helping me hang out washing in my imaginary garden.  As I came up with the scene in my head, I decided a collage would be the way to go. The advantage with collage is that is means you can create all the separate elements and then place them where you want on the page, which avoids the difficult task of painting the background around your subjects. It also means if you draw one element and then decide you don’t like it, well you don’t have to include it. This was the first time I have tried this but it was fun. I think it could be a good technique for children’s book illustration.

This is how I did it:
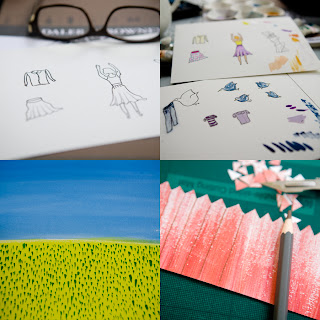
1.  I started off drawing my laundry girl, the birds and the clothes in pen and then painted them in.
2.  On a new sheet, using a flat 1 inch brush loaded with water, I wet the page and then painted on a blue wash for the sky.
3.  I then did the same with a green wash for the base of the grass.
4.  Once the grass was dry (I used a hairdryer to speed up the process), using a fine detail brush, I painted the texture of the grass using two different darker green colours for the texture of the grass.
5.  On a separate piece of paper, using a dry-ish flat brush and a red-ish brown mix of paint I painted strokes to give the texture of the fence. Once this was dry, using a scalpel, I cut out the zig-zag shape of the top of the fence and then drew on lines for the planks with brown pencil.
6.  I glued the fence to my sky/grass page, then cut out my laundry girl, the clothes and birds and glued them into place on the scene.
7.  Then I decided the scene needed some clouds, so I made some of those with a blue wash and stuck those on. 
That completed my illustration “Laundry Day”.


Thursday, September 1, 2011

Pushing through a down day - "Singing in the rain"

I was having a bit of a down day today.  You know when you just lack the energy to do anything.  And the weather seemed to reflect my mood: overcast and drizzly.  So how do you push through when you feel like that?  Well, in the words of an anonymous 2 year-old “sometimes you just have to have a nap and get over it”.  Yeah, that’s not a bad idea actually.  But I also think if you can just find a way to do something, anything creative, then that helps avoid getting into a rut.  So as I was stepping off the tram into the puddles, I suddenly thought of “Singing in the rain” (Glee version, of course) and how colourful umbrellas always cheer up a rainy day. I went home and, for the first time in weeks, got my paints out. Here’s my “Singing in the Rain” illustration (or perhaps it should called be “Dancing in the Rain”) in pen and gouache paint.